Layout Assistant

ElumTools can determine the quantity of luminaires required to meet a specific average illuminance level or PPFD for Horticulture, in a Room or Space (interior), or in an Area or Region (usually exterior). The process begins with an estimation which will produce three possible solutions. Luminaire quantity, light level and luminaire position are shown for each potential solution. You can move easily from one solution to another while viewing the proposals graphically. You can then confirm your selection with an accurate calculation, just as if you had selected one of ElumTools' other calculation options. Finally, you can export the luminaire positions and calculations back into your Revit view. The entire process uses only one command.


This is a tremendously helpful tool for designers, as it eliminates the guesswork associated with manually placing luminaire instances and ensures the accuracy of calculated results.


The Layout Assistant is available from the Calculate section of the toolbar. In these instructions we will demonstrate applicability to Revit Rooms, the operation is identical for Space boundary types. Exterior applications using Areas or Regions may require manipulations of luminaires once placed, but Layout Assistant provides a great starting point.


Basic Operation for a Single Room (start here)

The Selection dialog

The Layout Assistant dialog


Basic Operation for a Single Calculation Room:

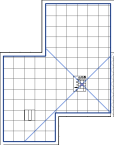
Layout Assistant can operate on Rooms, Spaces, Regions and Areas. In this example we will use a single Room. Similar steps can be used for other Calculation Areas (Spaces, Regions, Areas). Before using the Layout Assistant, you must have placed calculation points in the calculation area using the Add Points command. To use Layout Assistant for Horticulture (to calculate PPFD) you must have ElumTools set in Horticulture Mode, have placed PPFD calculation points and have horticultural luminaires (at least one) defined in Luminaire Manager with an instance placed in the Revit project.

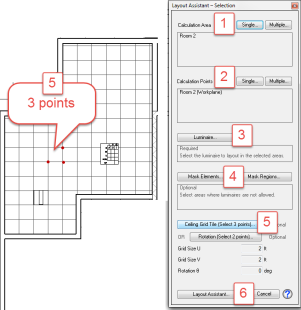
Click the Layout Assistant icon on the ElumTools toolbar. Follow these steps:


  1. From the Layout Assistant - Selection dialog, select the Single button under "Calculation Area". Now select the Room of interest.
  2. The Layout Assistant will automatically find any calculation point instances associated with the Room (or Calculation Area).
  1. Next step from the Selection dialog, click the Select Luminaire button. It is best if you have at least one instance of the desired luminaire type already placed in the Room. If you select an instance from a different Room, the assistant will function but may not know how to host the new luminaires when asked to place them in Revit at the conclusion of the process. Skip the Masking selections for basic use (see the Selection Dialog topic).
  1. Areas can be masked using Elements (geometry) or Regions where luminaires are not permitted. This step is omitted for basic operation. See the topic titled Layout Assistant Selection Dialog for more information.
 
  1. Select three corners of a ceiling tile if a suspended ceiling is in use (optional). Skip Rotation, as that is determined by the ceiling grid.
 
  1. Select the Layout Assistant button to advance to the next phase of the assistant (the Layout Assistant dialog).


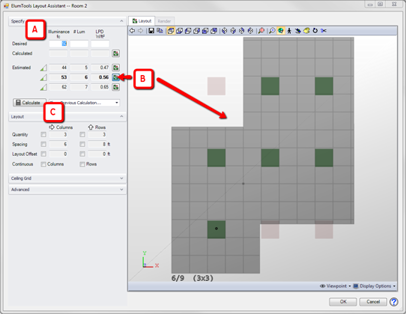
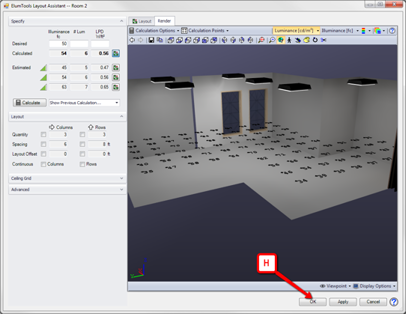
When phase two of the Layout Assistant opens (seen at right), follow these steps:
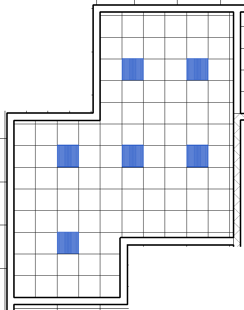
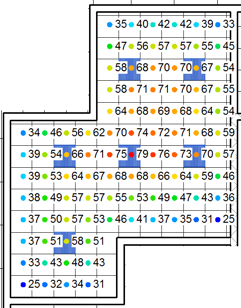
 

  1. Enter a desired illuminance level in fc or lux (current setting depends on project units). Optionally, you can enter a known number of luminaires or desired lighting power density (LPD).
  2. The assistant will display a list of three preliminary estimates. The closest to your selected criteria will be shown in the viewer, and a small button adjacent to the associated details is highlighted in blue. You can select the other estimates by clicking the button (current selection is highlighted). The shaded green triangle in the left column illustrates the confidence in accuracy (these are estimated results and have not been calculated entirely).
  3. Calculate your selected layout using the Calculate button. This will initiate a full radiosity calculation.
  4. The ElumTools visualization viewer will open in a separate tab in place of the plan view layout.
  5. The just calculated layout is now shown on the "Calculated" line with details in bold.
  6. A new set of estimates are proposed with higher confidence levels. You can select any of the new estimates (click the adjacent button) and calculate if you are not happy with the first calculation. Previous calculations can be recalled from the menu next to the Calculate button.
  7. Details of the proposed luminaire arrangement are shown in the Layout section in terms of Columns, Rows and Spacing. Any of these items can be adjusted by checking the box and entering a new value.
  8. To export the layout back to Revit, click the OK button. All luminaires and completed calculations will be returned to the Room in the current Revit view. The Apply button has similar functionality and will export the luminaires and calculations back to Revit but will allow you to remain in the Layout Assistant to explore different alternatives.


The Exported Layout

Once results have been exported from Layout Assistant, the luminaires and calculation points exist exactly as if they had been placed in the room using standard Revit/ElumTools procedures. You can turn the calculations on and off using the View/Hide Results command and schedule in the usual way. Luminaires can be moved manually and results recomputed using the Calculate Single (or Multiple) Room command.